What is Binding?
Binding is the process of using garments to compress the chest to produce a flatter appearance. People of many different gender identities bind for a lot of different reasons, and many choose not to. There are many safe ways to bind.
Where to Purchase a Binder
gc2b – Trans owned, multiple skin tones, lots of sizes. Free returns/exchanges.
Shapeshifter – Custom sized, handmade to order
Origami Customs – Made with reclaimed materials
ManSculpture – Zipper up options available
MyDOUBLEDESIGN – Free shipping & returns. Also carries a binding swimsuit.
Underworks – Website geared towards cisgender individuals
FLAVNT Streetwear – Has some cute colors
Local to RI
Ruth’s Lingiere, 106 Rolfe Square, Cranston, RI 02910
(401) 941-5155
Target – TOMBOYX brand – described as something between a tight sports bra and a binder
Binder Giveaways and Exchanges
The Binder Project – Three people each month will be selected at random from the list of entries, recipients will receive a brand new GC2B binder.
Gender Gear – Gender Gear is a Canadian based company that sells a variety of gender affirming gear, including $5 “pre-loved” binders to anyone in need.
Point of Pride – Point of Pride is an organization associated with .5cc, trans activist clothing company that provides lightly-used, free binders (chest compression garments) to any trans person who is in need of one.
FTM Essentials – FtM Essentials and our parent company, Early to Bed, are happy to announce their Free Youth Binder Program. Designed for folks 24 and under who are unable to purchase a binder on their own due to financial circumstances, we are able to offer a limited number of free binders to qualifying individuals.
Trans Active Gender Center – We send binders to people who will use them to curb dysphoria and/or to assist with daily gender presentation. All of our binders are sent to youth ages 18 and younger.
TransTape
(everything below is from their website!)
TransTape is made from a blend of 95% cotton and 5% spandex with a medical grade acrylic adhesive. It is latex-free and non-medicated, making it hypoallergenic. With this said, however, you may experience irritation, itching or redness or blistering after wearing TransTape. We recommend placing a small piece on the inside of your forearm with zero tension, then wait a FULL 24 HOURS to see if your skin reacts. If not, you can continue to use TransTape.
STEP 1: For best adhesive properties, start with fresh, clean skin, free of lotions or oils. Wash with a non-moisturizing soap; rinse well. (You may need to shave hair if excessive, quarter inch trim is okay)
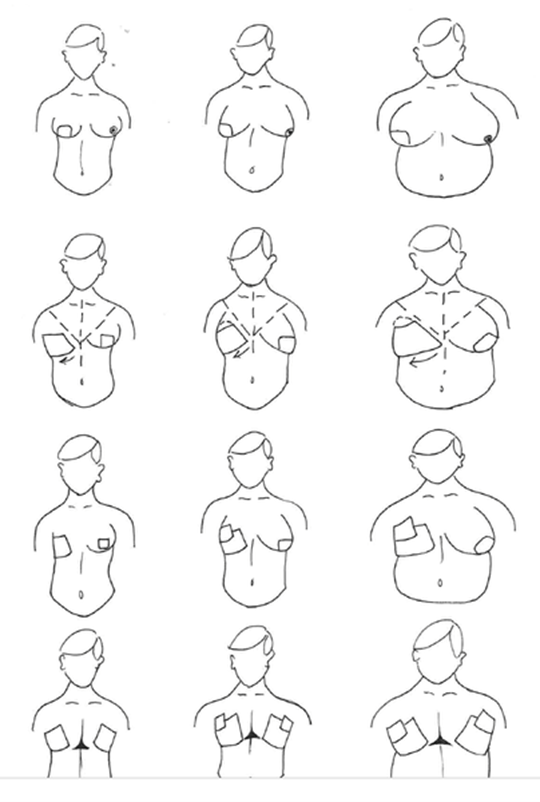
STEP 2: Make nipple covers. NEVER apply TransTape directly over nipple skin. ALWAYS wear a bandage or make a nipple cover using a short strip of TransTape and a toilet paper square. Cut 2 short strips, round the corners with scissors. Tear the protective paper in 2 places and discard the middle piece. Fold a square of toilet paper in 3rds, then in 3rds again; creating a pad. Stick the pad in the center of your strip. Repeat so there are 2, apply with zero stretch.
STEP 3: Choose the size or sizes that will work best for YOUR body. Cut all strips to size, then round the corners with scissors to avoid curling up on the edges and to create a more contoured look. TransTape will stretch a lot, so start shorter than you think. We suggest starting with 3-4 sections (dark blue lines) and adjusting from there. For a smaller build, use 3 sections, medium build 3.5-4 sections and for large and plus size start with 4 and adjust from there. You don’t want it to stretch onto your back, jut under your armpit. You should only need 2 pieces per side, 3 max. Less is better.
STEP 4: With your thumbs and index fingers, take your first strip at the first dark line, tear the protective paper, leaving it attached to your TransTape. If you are using multiple sizes and pieces, take your widest strip first. Remove the first section and discard. Peel back the second section, leaving the paper attached; fold and crease. This will create a handle so that you don’t touch the sticky part, lessening the adhesive. Repeat this process with all of your strips.
STEP 5: Divide your chest into sections starting at the center of your collar bone, down through your sternum and then again from the center of your breast bone to each shoulder on an angle (you may use an eyeliner pencil or washable marker to help create a visual line until you get the hang of it) Keep this area free of tape; this will allow you to wear open chest shirts and will create the illusion of being bare-chested.
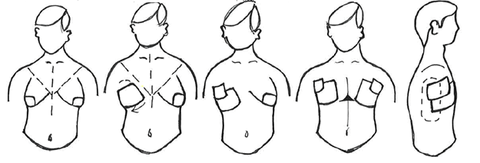
STEP 6: Push your breast tissue down and back with your hand. Line up your first piece with the section you have created, outside of your “open chest” area. Gently lay the first 2 inches of TransTape on your skin and lightly rub to activate the adhesive. Taking your time, line up your breast tissue so that it may all get tucked into the tape. Taking care not to overhandle your TransTape, as this will lessen the adhesive. Hold your TransTape taught, avoiding any wrinkles. Push your breast tissue flat, guiding the tape into place. Once you have found a comfortable place for your tissue to rest under your armpit area, remove the final piece of protective paper and smoothly lay the tape with zero tension. Rub the TransTape vigorously, creating friction to activate the adhesive.
STEP 7: At this point you may look a little silly and need a second piece to smooth things out. Take your second strip and prepare it like the first. Apply the second strip a few inches back from the first, overlapping to create flatness. Again, push the tissue out of the way with your hand and secure the fat with TransTape. Make sure that the second strip surpasses the first, ensuring skin contact. TransTape will not stick to itself and will curl up easily if not attached to the skin properly. Repeat this process on the other side. Comfort is the goal. Make sure you can breathe and move comfortably, if you cannot, something was done incorrectly. You may add an additional piece going vertically under your armpit, covering the ends of the strips for more security.
REMOVING:
Take special care when removing TransTape. Our adhesive was designed to withstand multiple days of wear with water use, regular showering and heavy activity, dirt and sweat involved. We recommend rubbing TransTape with oil and removing TransTape in the shower with hot water.
Always pull TransTape in the direction that it was adhered; if you apply from nipple to armpit, remove nipple to armpit.
As you put tension on TransTape, simultaneously rub the adhesive side with oil to loosen the connection with the skin.
Go slow! Ripping fast does not save you from any pain, it makes it much worse. By pulling TransTape quickly you are removing layers of delicate skin. It is very important to treat our skin and chest with love and respect if we want our bodies to remain healthy and happy. It is especially important to those of us that do plan to have top surgery that we aren’t abusing our skin but allowing it to restore, rejuvenate and maintain elasticity. Take time to massage your chest with healing oils on your rest nights. Although it is safe to sleep in TransTape, we do recommend a minimum of 2 nights per week that you dedicate as your rest days. We suggest overnight because 1) you won’t have to be awake to experience it 2) it is typically the longest period of time you will go without having to interact with people, and 3) you can oil yourself up and not have to worry about ruining a cool shirt.